Monday, August 27, 2012

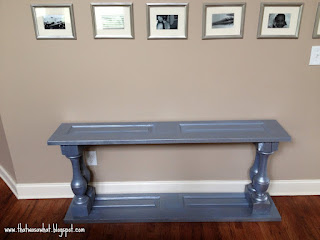
Guess What This Glitzy Console Table Used to Be!

I'm back! It has been a crazy, exciting, busy, and overwhelming week. I had no idea when I posted my tire ottoman last week, that a week later I would be chatting with people from Iowa to India, responding to magazines, learning more about the tire recycling initiative than I ever thought I would want to know, and starting a product line.

Through all of that, I just had to finish my latest "That Was A What?!" project. I'm starting to believe that the best full body massage has nothing on the sheer sense of relaxation I get from sanding and painting a piece of wood (as long as I don't start sweating...I hate sweating). So, anyway, a few months ago (okay, several months ago--I recall a Christmas tree being in the corner) I decided to do a wall of black and white photos.

I love how it brought that blank wall to life, and I did it on the cheap, so I love it even more (Dollar Store frames, custom mats from online, Walgreen's photo printing). As much as I loved the way it turned out, I still felt like something was missing. I thought about installing some can lights above the photos to light the wall, but that would require cutting and electrical stuffamajig. So, I settled on lamps. Only problem was I needed something for the lamps to sit on. I needed a CONSOLE TABLE!

The wall where I have the photos leads from the family room into the kitchen, and with the couch floating in the middle of the room the walk space is pretty narrow, so I needed a skinny table. I searched online and fell in love with this table by Restoration Hardware:


But, the price is listed at $1195-$1395. Yes, thousands. No, I don't think so. I do love it though. And the top of the table reminded me of some closet doors I had in my first college apartment. Could I, would I, should I...make the console table out of closet doors???

I could and I did! Wrote a story 'bout it, wanna hear it...here it go (yes, that's my homage to Calhoun Tubbs, In Living Color, circa 1992):

1) Headed over to this salvage door place in Midtown Atlanta that I pass every week on my way to White Provisions for the best shrimp po' boy in Atlanta. Got a set of bifold closet doors. The sales guy said $35, I said $25. I was thinking more like $10, but $25 is still less than $1195-$1395. They were too long, and hollow, but the guy offered to cut them down to the size I needed, added wood pieces to fill in the hollow gaps, and sanded the ends back down. So, I guess I got my $25 worth.

2) Went home, sanded those bad boys down, primed them, and painted them gray. They looked really dull, and I could just hear them telling me, "Nikki, we want to be fabulous, we want to shine, darling!" So I grabbed the bottle of Valspar Metal and Patina glaze I had left over from another project:


Those doors knew I was about to do something special to them! I could tell they knew they would never be the same.


They ended up like this:

3) For the legs, I went on Craigslist and started searching for those curvy, chunky legs that are on the Restoration Hardware table. After finding nothing by the description of "curvy, chunky legs" (at least nothing that I wanted anything to do with...happily married, thank you very much), I did some Googling and learned that they're called balustrades. So, I went back to Craigslist and searched for balustrades, and Plah-Dow! A guy had a porch railing with eight balustrades he was selling for $35. Of course I said, "$35! Good lawd, that's a lotta money." But he wasn't budging and $35 divided by 8 comes out to be only $4.38 per balustrade, and $35 is still less than $1195-$1395, so I got them.

4) Took them home to my man and asked him to pry the balustrades from the rail. Here they are free from bondage--sanded, painted and glazed:


5) Time to put Ms.Thang together!

Liquid Nails went on top and bottom of each balustrade.

6) And here she is all put together:


7) And a few shots with her all dressed up:


I love the imperfections in the corner leg!


Can't have any unsightly lamp cords showing.


Fancy, Fancy!


And that, my friends, is the story of how closet doors became a console. So, whaddya think?

Oh, yea, here's the cost breakdown:

Doors-$25
Balustrades-$17.52 (I used 4 at $4.38 each; 4 left for another table or something)

Total: $42.52! Sure beats $1195-$1395.

Now, whaddya think?

Sunday, August 19, 2012

Another Tire Saved from the Landfill


I wouldn't call myself a tree hugger, but I do take reusable bags to the grocery store, I've switched all my monthly bills to paperless emails, and I always, always, turn the water off while I'm brushing my teeth. Every little bit helps. But let me tell you, this last project I just finished is going to skyrocket me straight to recycling queen status!

I turned a tire into an ottoman! And not just any ottoman. It's  the kind of ottoman that you just want to sit and stare at for at least two hours with a glass of cold milk and a plate of warm chocolate chip cookies while your husband sits across from you nodding in amazement and approval.

I've been eyeing this ottoman for at least two years:
But, it's $522.99, and that's on Overstock.com (regular price $706). I wasn't trying to spend that much on an ottoman Especially when I know that if I think hard enough I can make it myself. After staring at my wish ottoman, I noticed that it looked a whole lot like, OMG, a tire. BINGO! I would make the ottoman out of a tire! Here's how it went down:

1) Jumped on Craigslist.com and searched for free semi-trailer tires (I wanted my ottoman to be a nice, round, full figured girl who isn't afraid to flaunt her curves). Found a company that sells used tires that had literally a mountain of tires they wanted to give away. Headed right over and picked my tire from the bunch.

2) Took her home and washed her up to remove any grease and grime.

 3) Started at outer edge of tire, and glued rope to tire one line at a time, rolling tire as I went.


4) Got a sheet of plywood and cut two circles the size of the tire's inner hole. Attached wood circles to tire openings using self-drilling wood screws.

5) Attached top plates to plywood topped tire in locations where legs would be stationed.
(3 legs will support a round ottoman just fine, but 4 legs can be used for added stability.)

6) Screwed legs on...and she stood!

 7) Cut and glued rope to wood circle to make the pattern I wanted. I used Crazy Glue the first time. I've since used hot glue and it worked as well.


 8)  A final double trim around the edges and done!


Can you believe she used to be a tire?!    


I love her!

Here are a few others I've made. They're on my online store Home AttireTM 
at www.homeattire.netI'm not taking orders right now, but the store is still open for viewing. 
Don't you just want to hug them? Tell me what you think of my tire ottomans.


P.S. If you decide to make a tire ottoman know that Manila rope is made of natural fibers from the abaca plant and is usually treated before importing. The treatment applied to the rope can leave a somewhat oily smell that may not be pleasing. If the smell of the rope is not to your liking, a spray of any odor eliminating product can remove the smell. The smell will resolve on its own in time as well. And, no, it doesn't smell like a tire! Just don't use a new tire, I'm sure that would smell like a tire.

One other thing...
I came up with this idea two years ago in 2012. Since I originally shared my idea it has spread across the Web like wild fire! I'm happy that so many people like my idea, and I only ask that if you decide to share my idea that you will give credit back to the source. I've seen more than a few people take credit for my idea with no mention of where they actually got their inspiration. So, remember...Be kind, what goes around comes around. 
~Nikki

Friday, August 3, 2012

The Pedestal That Wanted to Be a Bench

There it was, sitting in our garage for almost two years now. The pedestal that we inherited when we bought our house. I must explain that we bought the model home in our neighborhood a year after the builder had gone under. So, when they left, they left behind all sorts of builder stuff -- extra doors, windows, hardwood planks, and the pedestal (actually two of them). It had acrylic boxes on it and was used to hold marketing material. It looked like this:

My husband kept threatening to take it to the dumpster, and I kept insisting that I had plans for it. And I did, I just didn't know what they were yet. Until...I stood looking at the empty space at the top of the stairs at my sister's new townhouse! Just like that, it hit me. That space needed a big, chunky bench, and the pedestal living in my garage, if turned on its side, could be a bench! In fact, I believe it wanted to be a bench. After all, you know how people are always saying they don't want to be put on a pedestal. But everyone loves a good bench!

So, I went to work! That pedestal is some kind of heavy! As solid as it is, it was covered in laminate. I did my Googling on how to paint laminate furniture and landed on Lindsay's blog, Living with Lindsay. Her instructions were perfect and her supply list simple. The Zinsser Bulls Eye Primer she suggested worked like a charm. Best part, no sanding needed!


I did two coats of the primer then followed up with a lovely grey that I had mixed at Lowe's. The can of paint I bought was actually a light blue and was on the return rack for $3.00, so I just asked the paint guy to make it grey. He added a few drops of black, gave it a few turns and after a couple tries, I had the perfect grey! I went over to Home Depot next, got a 6x6 post, had it cut in to four, 12 inch pieces for the legs, sanded them (to get rid of splinters), primed them, then painted.

And here she is now in all her glory:

(She's pretty sturdy, but her legs will be attached with L brackets later.)


I love how chunky she is!

I made a wall tapestry to hang above the bench to top it all off. You can see it in this picture:
It has a real art gallery-type vibe!

And the final gem...

I blinged out one of the bench ends to cover the holes that were there!

And there you have it! The story of how a pedestal became a bench. I'll call it a "Pedebench." Ah-ha, the perfect seat for home done pedicures!

Total Cost for Custom Bench (including paint, stain, wood, and bling): $28.00

Wednesday, August 1, 2012

Hoop Dreams $16 Custom Window Treatments

To say that my son loves basketball is the understatement of all understatements. My little guy literally went from dribbling baby food down his shirt to dribbling a basketball down a court. Every day on the way home from his nanny's house he would stare out the window pleading, "Please see a 'gasketball' goal, please see a 'gasketball' goal." When he would spot one, he would throw his head back and shout, "'gasketball' gooooooooooooal!"

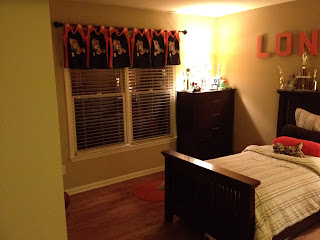
So, when it came time to give him a big boy room, the theme was a given...all things basketball. 10 years and four houses later (we've moved a lot), his room still reflects his love for the game. For the window treatments I wanted a topper look, but not just a regular topper. I wanted a topper made from basketball jerseys!

I'll pause here to give you your first "Get to Know Nikki Factoid." 
We'll call them Nikki's Knibbles & Bits.

Nikki's Knibbles & Bits #1: I can't sew at all. Not even a little bit.

With that bit of information, now you can understand how my desire for a basketball jersey topper had to be as simple as simple gets. I headed to Ross and lucked up on a heavy duty metal drapery rod, then to my local Conway store where I found a rack full of identical boy's nylon basketball jerseys marked down to $1 each!

Using the arm holes as rod pockets, I simply slid the jerseys on the rod, mounted the rod and voilà!
Six $1 jerseys and a $10 rod later, I had the ultimate b-ball lover's  window treatment and one happy little baller!


Score, wouldn't you say?