Thursday, July 4, 2013

My Love Affair with Mirrors...The Story Continues

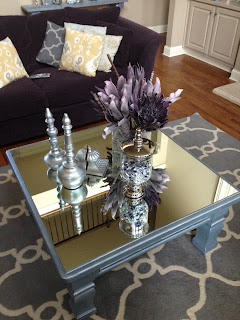
I shared in my last post Mirror, Mirror on the Table...how I transformed my old, worn and battered coffee table into a mirrored wonder. Here she is in all her glory:
When I made the decision to go reflective in my family room, I knew that it wouldn't stop with the table. I already had plans to replace my huge, rustic pine armoire with a sleeker, fancier version. My search lead me to this:

It's beautiful, right? It's by Bassett Furniture. And it's $2,630. Oh, they offer free shipping if that helps. Doesn't help? I didn't think so either, so I decided to make my own like I always do!


I started by jumping on Craigslist and searched for an armoire that had a similar shape with four panel doors. I found this one and negotiated the price down to $70. Hubby rented a truck from Home Depot for $30 and brought my new armoire home to me for the transformation. He's such a team player!

So here's how it went down...

1. Grabbed the handy Zinsser All-in-One primer and primed every inch. As I've said in previous posts, Zinsser primer means no sanding, and no sanding means no sweating, and no sweating means I'm a happy girl. As much as I enjoy the effort of building furniture and stuff I can't stand breaking a sweat. Weird, I know.

The armoire looked like this after she was primed...

After the priming, I did a coat of the same grey paint I've used on a bench, a console table, and coffee table (that can of paint definitely got more than it's money's worth; especially since I bought it from the sample rack). Once the paint dried, I followed up with my silver glaze. I was so excited with the way it was turning out that I forgot to take pictures of that step. With all the painting done, it was time to put her all together. I did a row of little mirrors on top like this:


The mirror cutting shop that cut the free bathroom mirror for the coffee table also cut and glued on some thinner mirrors for the armoire for $6 each. I could have left the doors with just the mirrors, but I noticed in the Bassett version that there were some X embellishments, so of course I had to add that. I found some kind of twisted silver wire from Lowe's and glass marbles from Michael's and went to town adding the fancy to the mirrors...
I used Glue Dots, but they didn't hold once the doors were vertical, so I'm going to try Crazy Glue. I was hoping the Glue Dots would work since they're not permanent. But, I guess I have to commit.
The doors were ready to be hung back on after the embellishing:
And now, the finished masterpiece...

Love her!

And here's a view with the mirrored armoire and matching mirrored coffee table:

I think I still may add mirrors to the sides to completely "mirror" the Bassett version, but I'm already so happy with it just the way it is! Up next, mirrored lamp shades, and then I promise my obsession with mirrors will be done. I think.

~Nikki
Total cost: $143.00. I saved $2,487 (that's my record best so far)!

Wednesday, July 3, 2013

Mirror, Mirror on the Table.. the Armoire... the Lamp...

Let me just start by saying, I am not vain. However, I am currently in L.O.V.E with mirrors! Specifically mirrors on furniture. Apparently mirrored furniture is the bomb diggity right now (or has been for some time now...I've been buried under tire ottomans <insert plug to www.homeattire.net> for the past year, so I may be a little behind). Anywho...as it usually happens, I came across this mirrored table:
It's from Horchow, it's all kinds of wonderful, and it's...$979. Wonk-wonk! You already know, it's not happening.  But I've been looking at my old, maple wood coffee table with the deep scratch from the time my stepson, Jordan, ran his Tonka truck across it, for about 15 years now. There were also some black permanent marker stains on there from an art project, but I was really good with strategic placement of decorative vases and such, so guests were none the wiser. But, I knew, and that alone is enough for an overhaul. Here she was in her later days all dolled up:

See, you don't even notice all her imperfections. You'll notice her cousin, the rustic armoire, over to the left...she was sent to pasture and replaced by a more mirror-friendly counterpart. More on that later.
So, the work began. I used my trusty Zinnser All-in-One Primer that frees me up from having to sand before painting.
This is what she looked like with her legs primed, painted and glazed:


And here she is all painted and glazed:


Then came the part that would take my new table from fabulous to full on glam...the mirror! I found a free bathroom mirror on Craigslist and took it to a glass cutting company that was actually not very far away from my house. They cut it to size, smoothed out the edges, sized and cut some lighter weight mirrors for the sides and even offered to glue it all on for me! I had every intention of getting some Mastic mirror glue from Lowe's and gluing the mirrors myself, but they offered to do it for free, so you know I took them up on the offer. Without further adieu, here she is all mirrored up:

And if you think that's something, here she is in full glam! I can't stop staring at her (really, I'm staring at the table and not my reflection in the mirror)...ok, here she is:

And her close up...
I am so loving this table! And on top of loving her aesthetic beauty, the financial savings just make her the symbol of perfection. Total money spent was only $30! That was the cost of having five mirrors cut to size. Everything else I already had or it was free. So $979 for the Horchow table vs. $30 for my handmade table...I think mine is the winner!

Now wait until you see what I did with this:

She deserves a post all her own! Stay tuned!

~Nikki

Monday, August 27, 2012

Guess What This Glitzy Console Table Used to Be!

I'm back! It has been a crazy, exciting, busy, and overwhelming week. I had no idea when I posted my tire ottoman last week, that a week later I would be chatting with people from Iowa to India, responding to magazines, learning more about the tire recycling initiative than I ever thought I would want to know, and starting a product line.

Through all of that, I just had to finish my latest "That Was A What?!" project. I'm starting to believe that the best full body massage has nothing on the sheer sense of relaxation I get from sanding and painting a piece of wood (as long as I don't start sweating...I hate sweating). So, anyway, a few months ago (okay, several months ago--I recall a Christmas tree being in the corner) I decided to do a wall of black and white photos.

I love how it brought that blank wall to life, and I did it on the cheap, so I love it even more (Dollar Store frames, custom mats from online, Walgreen's photo printing). As much as I loved the way it turned out, I still felt like something was missing. I thought about installing some can lights above the photos to light the wall, but that would require cutting and electrical stuffamajig. So, I settled on lamps. Only problem was I needed something for the lamps to sit on. I needed a CONSOLE TABLE!

The wall where I have the photos leads from the family room into the kitchen, and with the couch floating in the middle of the room the walk space is pretty narrow, so I needed a skinny table. I searched online and fell in love with this table by Restoration Hardware:


But, the price is listed at $1195-$1395. Yes, thousands. No, I don't think so. I do love it though. And the top of the table reminded me of some closet doors I had in my first college apartment. Could I, would I, should I...make the console table out of closet doors???

I could and I did! Wrote a story 'bout it, wanna hear it...here it go (yes, that's my homage to Calhoun Tubbs, In Living Color, circa 1992):

1) Headed over to this salvage door place in Midtown Atlanta that I pass every week on my way to White Provisions for the best shrimp po' boy in Atlanta. Got a set of bifold closet doors. The sales guy said $35, I said $25. I was thinking more like $10, but $25 is still less than $1195-$1395. They were too long, and hollow, but the guy offered to cut them down to the size I needed, added wood pieces to fill in the hollow gaps, and sanded the ends back down. So, I guess I got my $25 worth.

2) Went home, sanded those bad boys down, primed them, and painted them gray. They looked really dull, and I could just hear them telling me, "Nikki, we want to be fabulous, we want to shine, darling!" So I grabbed the bottle of Valspar Metal and Patina glaze I had left over from another project:


Those doors knew I was about to do something special to them! I could tell they knew they would never be the same.


They ended up like this:

3) For the legs, I went on Craigslist and started searching for those curvy, chunky legs that are on the Restoration Hardware table. After finding nothing by the description of "curvy, chunky legs" (at least nothing that I wanted anything to do with...happily married, thank you very much), I did some Googling and learned that they're called balustrades. So, I went back to Craigslist and searched for balustrades, and Plah-Dow! A guy had a porch railing with eight balustrades he was selling for $35. Of course I said, "$35! Good lawd, that's a lotta money." But he wasn't budging and $35 divided by 8 comes out to be only $4.38 per balustrade, and $35 is still less than $1195-$1395, so I got them.

4) Took them home to my man and asked him to pry the balustrades from the rail. Here they are free from bondage--sanded, painted and glazed:


5) Time to put Ms.Thang together!

Liquid Nails went on top and bottom of each balustrade.

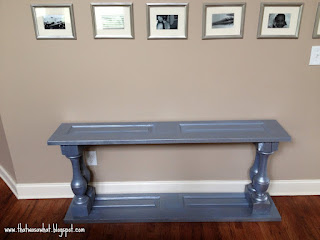
6) And here she is all put together:


7) And a few shots with her all dressed up:


I love the imperfections in the corner leg!


Can't have any unsightly lamp cords showing.


Fancy, Fancy!


And that, my friends, is the story of how closet doors became a console. So, whaddya think?

Oh, yea, here's the cost breakdown:

Doors-$25
Balustrades-$17.52 (I used 4 at $4.38 each; 4 left for another table or something)

Total: $42.52! Sure beats $1195-$1395.

Now, whaddya think?

Sunday, August 19, 2012

Another Tire Saved from the Landfill


I wouldn't call myself a tree hugger, but I do take reusable bags to the grocery store, I've switched all my monthly bills to paperless emails, and I always, always, turn the water off while I'm brushing my teeth. Every little bit helps. But let me tell you, this last project I just finished is going to skyrocket me straight to recycling queen status!

I turned a tire into an ottoman! And not just any ottoman. It's  the kind of ottoman that you just want to sit and stare at for at least two hours with a glass of cold milk and a plate of warm chocolate chip cookies while your husband sits across from you nodding in amazement and approval.

I've been eyeing this ottoman for at least two years:
But, it's $522.99, and that's on Overstock.com (regular price $706). I wasn't trying to spend that much on an ottoman Especially when I know that if I think hard enough I can make it myself. After staring at my wish ottoman, I noticed that it looked a whole lot like, OMG, a tire. BINGO! I would make the ottoman out of a tire! Here's how it went down:

1) Jumped on Craigslist.com and searched for free semi-trailer tires (I wanted my ottoman to be a nice, round, full figured girl who isn't afraid to flaunt her curves). Found a company that sells used tires that had literally a mountain of tires they wanted to give away. Headed right over and picked my tire from the bunch.

2) Took her home and washed her up to remove any grease and grime.

 3) Started at outer edge of tire, and glued rope to tire one line at a time, rolling tire as I went.


4) Got a sheet of plywood and cut two circles the size of the tire's inner hole. Attached wood circles to tire openings using self-drilling wood screws.

5) Attached top plates to plywood topped tire in locations where legs would be stationed.
(3 legs will support a round ottoman just fine, but 4 legs can be used for added stability.)

6) Screwed legs on...and she stood!

 7) Cut and glued rope to wood circle to make the pattern I wanted. I used Crazy Glue the first time. I've since used hot glue and it worked as well.


 8)  A final double trim around the edges and done!


Can you believe she used to be a tire?!    


I love her!

Here are a few others I've made. They're on my online store Home AttireTM 
at www.homeattire.netI'm not taking orders right now, but the store is still open for viewing. 
Don't you just want to hug them? Tell me what you think of my tire ottomans.


P.S. If you decide to make a tire ottoman know that Manila rope is made of natural fibers from the abaca plant and is usually treated before importing. The treatment applied to the rope can leave a somewhat oily smell that may not be pleasing. If the smell of the rope is not to your liking, a spray of any odor eliminating product can remove the smell. The smell will resolve on its own in time as well. And, no, it doesn't smell like a tire! Just don't use a new tire, I'm sure that would smell like a tire.

One other thing...
I came up with this idea two years ago in 2012. Since I originally shared my idea it has spread across the Web like wild fire! I'm happy that so many people like my idea, and I only ask that if you decide to share my idea that you will give credit back to the source. I've seen more than a few people take credit for my idea with no mention of where they actually got their inspiration. So, remember...Be kind, what goes around comes around. 
~Nikki